
About Us
Welcome to Granite Kings & Construction! For nearly a decade, we have provided complete remodeling and construction solutions for numerous residential and commercial properties in Houston, Texas
Get a free quote
Welcome!... To Granite Kings

Mastering drywall finishing like a pro requires a step-by-step approach and expert tips.
- Start by prepping the surface, ensuring it’s clean and smooth.
- Next, apply a coat of primer to help the mud adhere to the drywall.
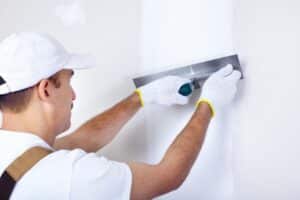
- Then, use a taping knife to spread joint compound over the joints, making sure to feather the edges for a seamless finish.
- After the first coat dries, sand the area to remove any imperfections and apply a second coat if needed.
- Finally, sand again and apply a final coat for a flawless result.
Expert tips include using a hawk and trowel for a professional finish and applying light pressure while sanding to avoid damaging the drywall. With practice and these techniques, anyone can master drywall finishing like a pro.
Step-by-Step Guide to Finishing Drywall Joints
Finishing drywall joints can be a daunting task, but with a step-by-step guide, it becomes much more manageable.
- Start by applying joint compound to the joints and embedding joint tape.
- Then, apply a second coat of compound, feathering the edges to create a smooth surface.
- After the compound has dried and been sanded, apply a third coat, making sure to feather the edges even more.
- Finally, sand the joints to ensure a seamless finish.
By following these steps, you can ensure that your drywall joints are properly finished and ready for painting, leaving your walls looking professionally done.
Tips Before Taping Drywall
Before taping drywall, it’s important to properly prepare the surface. This includes making sure the seams are properly aligned and the drywall is properly fastened to the studs. It’s also important to use the right type of joint compound and tape for the job.
Additionally, make sure to clean the surface thoroughly before applying the compound to ensure a smooth finish. It’s also a good idea to apply a thin coat of compound and let it dry before applying additional coats. Taking the time to properly prepare and apply the joint compound will result in a professional-looking finish.
Step-by-Step Drywall Taping Process
The drywall taping process involves several steps to achieve smooth and seamless walls.
- First, the seams between the drywall sheets are filled with joint compound using a taping knife.
- Then, paper or fiberglass drywall tape is applied over the seams and embedded into the joint compound.
- The excess compound is smoothed out with the taping knife and allowed to dry.
- After drying, additional layers of joint compound may be applied and sanded down to create a flawless finish.
This step-by-step process requires precision and patience to ensure the final result is a professional-looking, blemish-free surface ready for painting or wallpapering.
drywall finishing Common Mistakes and How to Avoid Them
Drywall finishing is a crucial step in the construction or remodeling process, and it requires attention to detail to achieve a professional result.
One common mistake is not properly preparing the drywall surface before applying the finishing compound, which can lead to an uneven or bumpy texture.
Another mistake is not allowing the compound to dry completely between coats, resulting in visible seams and a rough finish.
To avoid these issues, make sure to thoroughly sand and clean the drywall before starting the finishing process, and allow ample drying time between coats.
Additionally, using the right tools and techniques, such as feathering the edges and blending the compound seamlessly, can help achieve a smooth and flawless finish.
Taking the time to properly prepare and execute the drywall finishing process can make a significant difference in the overall appearance of a space.
Essential Tools and Materials for Perfect Drywall Finishing
The key to achieving perfect drywall finishing lies in using the essential tools and materials. These include a drywall taping knife, mud pan, and joint compound for taping and mudding. A good quality sanding sponge or sanding block is crucial for smoothing out the dried mud.
Additionally, a reliable drywall sander or pole sander is essential for larger jobs. A corner trowel and corner bead can help achieve crisp, clean corners. It’s also important to have a good quality primer and paint for the final touches. With these essential tools and materials in hand, you can ensure a flawless finish on your drywall projects, leaving them looking professional and polished.
Troubleshooting Common Drywall Finishing Problems
Drywall finishing can be a challenging task, and it’s not uncommon to encounter some common problems along the way. One common issue is poor taping, which can result in visible lines and bumps. To fix this, apply another layer of joint compound and feather the edges to blend with the surrounding surface.
Another problem is excessive sanding, which can lead to over-smoothed or uneven areas. In this case, it’s best to reapply joint compound to build up the affected areas and resand them for a smoother finish.
Additionally, blisters and bubbles can occur when the joint compound is applied too thickly or when the adhesive isn’t properly set. To troubleshoot this, carefully cut out the affected area, replace the drywall tape, and apply a thin, even layer of joint compound.
Expert Insights: Drywall Finishing Dos and Don’ts
When it comes to drywall finishing, it’s important to follow certain dos and don’ts to ensure a smooth and professional-looking result.
One of the dos is to use the right tools and materials for the job, such as good quality joint compound and a proper taping knife.
Another important do is to take the time to properly sand the drywall to achieve a smooth and even surface.
On the don’t side, it’s important not to rush the process and to avoid applying too much joint compound, as this can result in a lumpy and uneven finish.
Additionally, it’s crucial to avoid leaving any rough or uneven edges while applying the joint compound. Following these expert insights can help ensure a successful drywall finishing project.
Expert Drywall Services – Your Trusted Drywall Contractors
Mudding and Sanding Techniques:
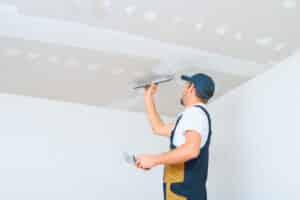
Mudding and sanding are essential techniques in the process of preparing surfaces for painting. Mudding, also known as drywall taping, involves filling in seams and holes with joint compound to create a smooth surface. This technique requires precision and patience to achieve a flawless finish. Once the joint compound is dry, sanding is necessary to smooth out any imperfections and create a uniform surface. Using the right sandpaper and technique is crucial for achieving a professional result. Both mudding and sanding are labor-intensive processes, but they are vital for ensuring the quality and longevity of the paint job.
Corner Bead Installation:
Corner bead installation is a crucial step in the process of drywall finishing. The corner bead is used to reinforce and protect the vulnerable corners of walls, preventing damage from accidental bumps and scrapes. To install corner bead, first, measure and cut it to fit the length of the corner. Then, use a trowel to apply a thin layer of joint compound along the corner and press the bead into place. Once the bead is installed, additional layers of joint compound can be applied to smooth out the surface. Proper installation of corner bead is essential for achieving a professional-looking finish on drywall corners.
For any questions you can call us at (281) 790-8478
Drywall Finishing Levels
What are the 5 levels of drywall finish?
The five levels of drywall finish are categorized based on the degree of smoothness and readiness for painting or wallpapering.
Level 0 is unfinished with exposed joints and fasteners.
Level 1 has only taped joints and is suitable for temporary construction.
Level 2 includes a coat of joint compound over the tape and fasteners, ideal for garages or storage areas.
Level 3 features additional coats of compound, suitable for areas where moderate lighting conditions are expected.
Level 4 involves multiple coats of compound and is suitable for areas with critical lighting conditions.
Level 5 is the highest quality, involving specialized finishing techniques for areas with severe lighting conditions.
What does Level 4 drywall finish mean?
Level 4 drywall finish refers to a high-quality finish that requires multiple coats of joint compound and extensive sanding to achieve a smooth and uniform surface. This level of finish is typically used in areas where lighting is critical, such as high-end residential or commercial spaces.
Level 4 finish is designed to minimize the visibility of seams, tape, and other imperfections, providing a seamless and flawless appearance. It is often specified for walls with gloss, semi-gloss, or enamel paints, as these types of finishes tend to highlight any imperfections in the drywall. Achieving a Level 4 finish requires skilled craftsmanship and attention to detail, and it results in a polished and professional look that enhances the overall appearance of the space.
How do you get a level 4 drywall finish?
To achieve a level 4 drywall finish, several steps are involved.
- First, the seams and fastener heads are filled with joint compound and allowed to dry.
- Then, the walls are sanded smooth to remove any excess compound and create a uniform surface.
- Next, a thin skim coat of joint compound is applied over the entire wall to fill in any remaining imperfections and create a cohesive surface.
- After the skim coat dries, the walls are sanded again to achieve a smooth, even finish.
- It’s important to pay attention to detail and take the time to properly prepare the walls for painting or finishing.
By following these steps and taking the necessary care, a level 4 drywall finish can be achieved, resulting in a high-quality and professional appearance.
Does Level 4 finish include primer?
Yes, Level 4 finish does include primer. Level 4 finishing refers to the highest quality of drywall finish, typically used in areas where light conditions are critical. This level of finish includes the application of a coat of drywall primer, which helps to create a smooth and even surface for the final paint application. The primer also helps to improve paint adhesion and coverage, resulting in a more professional and long-lasting finish.
By including primer as part of the Level 4 finish, it ensures that the drywall surface is properly prepared and ready for the final paint or wall covering, meeting the highest standards of quality and appearance. Therefore, if you are looking for a flawless, high-quality finish for your drywall, Level 4 finish with primer is the way to go.
What is a level 5 finish?
A level 5 finish refers to the highest quality of drywall finishing. It involves multiple layers of joint compound and careful sanding to create a smooth, seamless surface. This finish is typically reserved for areas that will receive a high level of visibility, such as in commercial spaces or high-end residential properties.
Achieving a level 5 finish requires a great attention to detail and a high level of skill from the drywall finisher. It is the most labor-intensive and time-consuming finish, but it results in a flawless appearance that is free from any imperfections or blemishes.
This level of finish is often specified by architects and designers who want a pristine, professional look for their interiors. Overall, a level 5 finish is the gold standard for drywall finishing and creates a polished and sophisticated final product.
When Is a Level-5 Drywall Finish Needed?
A Level-5 drywall finish is typically needed in high-end or specialty applications where the smoothest surface possible is desired. This level of finish is achieved by applying a skim coat of joint compound over the entire surface of the drywall, followed by a thorough sanding and possible application of a primer.
Level-5 finishes are often used in areas where critical lighting conditions exist, such as in photography studios, art galleries, or high-end residences with extensive natural light. They can also be utilized in spaces where walls are going to be painted with glossy or semi-gloss paints, as these finishes tend to highlight any imperfections in the surface. Ultimately, a Level-5 finish is necessary when a flawless, high-quality appearance is required for the drywall surface.
What’s the difference between Level 4 and Level 5 drywall finish?
Level 4 and level 5 drywall finishes are both considered to be top-quality finishes, but there are some differences between the two.
Level 4 is generally used for areas that will be receiving a heavy or textured wall covering, such as brick or textured paint. It involves the application of a skim coat over the entire surface to create a uniform, non-textured appearance.
Level 5, on the other hand, is the highest quality finish and is recommended for areas that will have a gloss, semi-gloss, or flat paint. This level of finish requires an additional skim coat and sanding to ensure a perfectly smooth surface. Level 5 finish is also less likely to show any imperfections and is the preferred choice for high-end projects where a flawless finish is desired.
Where Drywall Finishing Levels Apply
Drywall finishing levels are critical for achieving a flawless surface before painting or wallpapering. They are applied in various areas of construction where drywall is used, ensuring smooth, uniform walls and ceilings. These levels are commonly employed in residential and commercial projects, including homes, offices, retail spaces, and institutional buildings.
Specifically, drywall finishing levels are essential in rooms where aesthetics matter, such as living rooms, bedrooms, and reception areas, where imperfections are highly visible. Additionally, they are crucial in high-traffic zones like hallways and corridors, where durability and a polished appearance are key. Ultimately, drywall finishing levels are indispensable across a wide range of construction projects for creating visually appealing and structurally sound surfaces.

What is the best finish for drywall?
The best finish for drywall typically depends on the desired final look and the level of maintenance required. For a smooth and seamless appearance, a level 5 finish is often recommended, which involves applying multiple layers of joint compound and sanding between coats. This level of finish is ideal for areas with high visibility, such as living rooms or hallways.
For a less polished look, a level 4 finish may be sufficient, which involves one layer of joint compound and a light sanding. It is commonly used in areas with less traffic, such as closets or garages. Ultimately, the best finish for drywall is one that meets the aesthetic and functional needs of the space, and consulting with a professional can help determine the most suitable finish for any specific project.
Drywall finishing texture
Drywall finishing texture refers to the final surface treatment of drywall before it is ready for painting or wallpapering. There are several types of finishing textures, each providing a different look and feel to the walls. Some popular drywall finishing textures include smooth finish, knockdown, orange peel, and popcorn.
The smooth finish is achieved by applying a thin layer of joint compound and sanding it to create a seamless surface.
Knockdown texture involves spraying joint compound on the walls and then using a trowel to flatten it, creating a textured look.
Orange peel texture is achieved by spraying joint compound onto the walls and then using a roller to create a slightly bumpy surface.
Popcorn texture, on the other hand, creates a heavily textured surface that resembles the appearance of popcorn. The choice of finishing texture depends on the desired aesthetic and the overall design of the space.
To prepare a consultation please call us at (281) 790-8478