
About Us
Welcome to Granite Kings & Construction! For nearly a decade, we have provided complete remodeling and construction solutions for numerous residential and commercial properties in Houston, Texas
Get a free quote
Welcome!... To Granite Kings

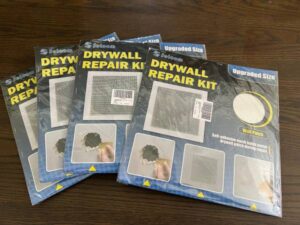
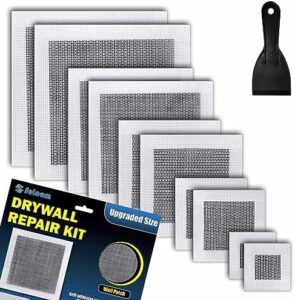
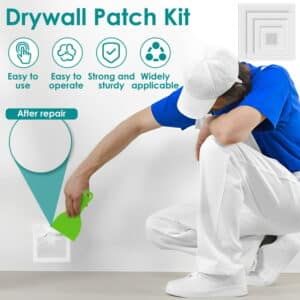
Drywall repair kit: When facing drywall imperfections, a reliable drywall repair kit is indispensable. From small holes to large cracks, these kits, like the top picks we’ve selected, offer seamless solutions for any wall repair project. Packed with essential tools like spackle, sandpaper, and self-adhesive mesh patches, these kits make wall repair a breeze. Whether you’re fixing drywall dents or water damage, the right kit, complete with everything you need from primer to paint, ensures a professional finish. Easy to apply and sturdy in fix, these kits make you feel like a pro, making the repair process smooth and efficient.
Features OF Drywall Repair Kit
The features of a quality drywall repair kit encompass a comprehensive set of tools and materials essential for seamless wall restoration. From spackle and joint compound to self-adhesive mesh patches, these kits contain everything needed to mend small holes or tackle larger cracks with ease. With sandpaper and putty knives included, achieving a smooth finish becomes effortless, ensuring a professional-quality repair job. Whether fixing drywall on ceilings or walls, these kits cater to various needs, making them versatile for any repair process. Their ability to handle water damage, dents, or holes, combined with easy application and durable results, makes them ideal choices for both DIY enthusiasts and professional contractors alike.
Choosing the Best Drywall Repair Kits—Buying Guide
When it comes to choosing the best drywall repair kit, there are a few key factors to consider. First, consider the size of the repair job you’ll be tackling. If it’s a small hole or crack, a simple patch kit may do the trick. However, for larger repairs, you’ll want a more comprehensive kit that includes joint compound, sandpaper, and a putty knife. Next, consider the quality of the materials included in the kit. Look for a kit with high-quality joint compound and durable patching materials.
Additionally, consider the convenience of the kit—does it come with everything you need in one package, or will you need to purchase additional tools and materials separately? Lastly, make sure to read reviews and compare brands to ensure you’re getting a reliable and effective drywall repair kit.
Professional Drywall Repair
Professional drywall repair is an essential service for homeowners and businesses looking to maintain the appearance and structural integrity of their properties. Whether it’s caused by water damage, holes, or general wear and tear, damaged drywall can be unsightly and even pose safety hazards if not properly addressed. Hiring a professional drywall repair service ensures that the job is done right the first time, saving time and money in the long run.
Experienced professionals have the necessary skills, tools, and expertise to seamlessly repair and restore damaged drywall, leaving behind a flawless finish. From patching up small cracks to replacing entire sections of drywall, a professional repair service can tackle any job with precision and efficiency, ultimately enhancing the overall aesthetic and functionality of the space.
Top Tips For Moisture Resistant Drywall In Bathroom
DIY Drywall Repair: Choosing the Right Kit for Your Project
When it comes to DIY drywall repair, selecting the right kit for your project is essential. There are various options available, from basic patching kits to more comprehensive repair kits that include everything you need to tackle larger holes and dents.
Consider the size and severity of the damage to determine which kit is best for your needs. Basic patching kits are suitable for small holes and cracks, while more advanced kits with mesh or pre-cut patches are ideal for larger areas of damage.
Additionally, look for kits that include all the necessary tools and materials, such as joint compound and sandpaper, to ensure you have everything you need to complete the repair. By choosing the right kit, you can save time and ensure a professional-looking finish for your drywall repair project.
Seamless Solutions: Top Drywall Repair Kit for Every Budget
If you’re in need of a drywall repair kit that won’t break the bank, Seamless Solutions has you covered. Their top drywall repair kit options cater to every budget, ensuring that you can find the right tools for your project without overspending. Whether you’re a DIY enthusiast or a professional contractor, Seamless Solutions offers a range of affordable yet high-quality options that include everything you need to tackle drywall repairs with ease.
From patching compound and sanding tools to complete repair kits with all the necessary accessories, Seamless Solutions has carefully curated a selection of products to meet various needs and budgets. With their reliable and cost-effective solutions, you can confidently take on any drywall repair project without breaking the bank.
How to Use a Drywall Repair Kit: Step-by-Step Guide
Using a drywall repair kit is a simple and cost-effective way to fix small holes and cracks in your walls.
To start, clean the damaged area and apply the spackling compound with a putty knife, filling the hole or crack completely.
Once the spackling is dry, sand the area smooth with a sanding sponge or sandpaper.
Next, apply a primer to the repaired area to ensure that the paint will adhere evenly.
After the primer is dry, you can paint the repaired spot to match the rest of the wall.
It’s important to follow the specific instructions included with your drywall repair kit for the best results. With a little time and effort, you can easily repair minor damage to your walls and keep them looking their best.
Comparing Drywall Repair Kits: Which One Is Right for You?
Drywall repair kits come in various forms, from simple patch and repair sets to more elaborate kits with multiple tools and products. The right one for you will depend on the extent of the damage and your level of expertise. If you’re dealing with a minor hole or crack, a basic patch kit with self-adhesive mesh and spackling may be all you need. However, if you’re tackling a larger area or are a more experienced DIYer, a full repair kit with joint compound, sanding tools, and a putty knife may be better suited. Consider the scope of your project and your comfort level with drywall repairs when choosing the right kit for you.
Tips for Repairing Drywall with a Patch Kit
When using a patch kit to repair drywall, it’s crucial to follow a few key tips for optimal results. Begin by preparing the damaged area, ensuring it’s clean and free of debris. Cut the patch material slightly larger than the hole, allowing for a seamless fit. Apply a thin layer of joint compound around the edges of the hole, then firmly press the patch into place. Use a putty knife to smooth out any excess compound and feather the edges for a seamless finish. Once dry, sand the area smooth before priming and painting to match the surrounding wall. Remember to follow the manufacturer’s instructions included in the patch kit for the best outcome.
What are the main causes of drywall damage?
The main causes of drywall damage include water leaks, which can result in mold growth and weakening of the drywall. Impact from heavy objects or furniture can also cause dents and cracks. Settlement of the building foundation or shifting of the structure can lead to cracks and warping in the drywall.
Poor installation or inadequate support can also contribute to drywall damage over time. Additionally, excessive moisture in the air can cause the drywall to swell and deteriorate. Regular maintenance and prompt repairs can help prevent and address these issues before they worsen.
Can I use a drywall repair kit for ceiling cracks?
Yes, you can use a drywall repair kit for ceiling cracks. These kits typically include everything you need to patch and repair small to medium-sized cracks in drywall, including joint compound, a putty knife, and sandpaper. However, if the cracks in your ceiling are particularly large or extensive, it may be best to consult a professional to ensure proper repair and support. If the cracks in your ceiling are smaller and more manageable, using a drywall repair kit can be a cost-effective and relatively simple way to address the issue and restore the appearance of your ceiling.
Can I use a drywall repair kit for exterior walls?
No, it is not recommended to use a drywall repair kit for exterior walls. Drywall repair kits are specifically designed for indoor use and may not be able to withstand the elements and weather conditions that outdoor walls are exposed to. It is best to use materials and products that are specifically made for exterior wall repair, such as exterior spackle or patching compound. These products are designed to hold up against moisture, temperature changes, and other outdoor factors, ensuring a lasting and effective repair for your exterior walls.
Can a drywall repair kit fix water damage?
Yes, a drywall repair kit can help fix water damage to a certain extent. If the water damage is minimal and has not caused extensive crumbling or warping of the drywall, a repair kit can be used to patch up the affected area. However, if the water damage is more severe, such as widespread mold growth or significant structural damage, it may be necessary to replace the affected drywall entirely. In those cases, a professional may need to be consulted to properly assess the damage and recommend the appropriate course of action.
Drywall repair kit for large holes
For those dealing with large holes in their drywall, a drywall repair kit specifically designed for big repairs can be a lifesaver. These kits typically include all the necessary tools and materials to effectively patch up larger holes, such as a self-adhesive patch, joint compound, and a putty knife.
The self-adhesive patches are ideal for covering holes without the need for additional support, while the joint compound and putty knife allow for seamless blending with the existing wall. This makes the repair process much easier and less time-consuming. With a drywall repair kit for large holes, even those with minimal experience in home repairs can achieve professional-looking results in no time.
Wall repair kit for small holes
If you have small holes in your wall that need repair, a wall repair kit is the perfect solution. These kits usually include everything you need to patch up small holes, such as spackling compound, sandpaper, and a putty knife. They are designed to be user-friendly and easy to use, making it a simple task to fix any minor damage to your walls. The spackling compound dries quickly and can be sanded down to create a smooth finish, leaving your walls looking as good as new. With a wall repair kit, you can save time and money on hiring a professional, and take care of the small repairs around your home with confidence.
For any questions please call us at (832) 455-6721
Best Drywall Repair Kits for Small Holes and Cracks
When it comes to repairing small holes and cracks in drywall, having the right tools is essential. There are several drywall repair kits available on the market that are specifically designed for small repairs. Some of the best drywall repair kits for small holes and cracks include the 3M High Strength Small Hole Repair Kit, the Dap DryDex Wall Repair Patch Kit, and the Red Devil Onetime Wall Repair Patch. These kits typically include everything you need to patch small holes and cracks, such as spackle, sandpaper, and putty knives.
drywall patch
A drywall patch is a vital component in the process of repairing damaged walls efficiently. Whether you’re dealing with small holes, cracks, or larger damaged areas, a well-chosen drywall patch ensures a seamless and durable fix. These patches often come as part of a comprehensive drywall repair kit, complete with spackle, sandpaper, and other essential tools.
Self-adhesive drywall repair fabric and high-strength small hole repair kits contribute to the effectiveness of a drywall patch. Whether you’re a DIY enthusiast or a professional contractor, utilizing a drywall patch as part of the repair process guarantees a professional finish and restores the integrity of your walls.
How do you seamlessly patch drywall?
Seamlessly patching drywall requires attention to detail and the right tools.
- First, carefully cut out the damaged area of the drywall using a utility knife.
- Then, measure and cut a new piece of drywall to fit the hole.
- Secure the new piece in place with drywall screws, making sure it sits flush with the surrounding wall.
- Apply joint compound over the seams and smooth it out with a putty knife.
- After allowing the compound to dry, sand the area to create a smooth and seamless finish.
- Repeat the process of applying joint compound and sanding until the patch blends in seamlessly with the rest of the wall.
- Finally, prime and paint the patched area to complete the seamless look.
How do you smooth out drywall patches?
- To smooth out drywall patches, start by sanding the patched area with a 120-grit sandpaper to remove any rough edges and create a smooth surface.
- Wipe away any dust with a damp cloth and let it dry.
- Next, apply a thin layer of joint compound over the patched area using a putty knife, feathering the edges to blend it with the surrounding wall.
- Allow the compound to dry completely and then lightly sand it with a 220-grit sandpaper to smooth out any imperfections.
- Wipe away any dust and apply a second thin layer of joint compound, repeating the sanding and wiping process until the patched area is smooth and seamless with the rest of the wall.
- Finally, prime and paint the patched area to complete the process.
How do you get drywall texture after patching?
After patching a hole or repairing a damaged area on the drywall, you can recreate the texture by following a few simple steps.
First, apply a thin layer of joint compound over the patched area and let it dry completely.
Once dry, lightly sand the area to smooth out any imperfections.
Next, mix the joint compound with water to a thick, paint-like consistency. Using a texture brush or a roller, apply the compound to the wall in a stippling or swirling motion, depending on the desired texture.
Finally, let the texture dry completely before painting over it. Keep in mind that practice makes perfect, so don’t be discouraged if your first attempt isn’t exactly what you were hoping for. With some patience and practice, you’ll be able to master the art of drywall texturing after patching.
How do you make drywall patches invisible?
Making drywall patches invisible involves several steps.
- First, the area around the patch should be sanded down to create a smooth and even surface.
- Then, a primer should be applied to the patched area to help the paint adhere evenly.
- Next, the patched area should be painted with the same color and finish as the surrounding wall. It’s important to feather the edges of the paint to blend it seamlessly with the rest of the wall.
- Finally, adding a texture to the patched area can help further camouflage the repair.
By following these steps and taking care to match the color and texture of the surrounding wall, it is possible to make drywall patches virtually undetectable.
For any questions you can call us at (832) 455-6721